Cuttlebone Casting Jewellery | DIY Cuttlefish Casting Process
Page Content Navigation
How-To: Cuttlebone Casting Jewellery
Cuttlebone casting is an ancient technique that has been used for many years to create unique jewellery designs.
This is an interesting process that uses the bones of a cuttlefish (you’ve probably seen them in birdcages for birds to sharpen their beaks on) to produce a mold which you can pour in liquefied material in a casting process.
Using this technique you’re able to create unique 2 sided designs that match up perfectly so the only thing you’re bound by is the size of the bone you’re using and your creativity.
It’s a basic, yet perfectly suited step for anyone to take who is interested in starting to make parts using a mold.
You don’t need a lot of expensive equipment – just some cutting utensils, some tools to carve out your design and a torch to liquefy your casting material and you’re pretty much ready to get started. One quick thing – some of the links on this page are affiliate links and as an Amazon Associate I might earn a tiny amount from qualifying purchases. It’s literally a few cents.
Here is a list of basic equipment to get you started:
- Jeweler’s saw like this one.
- Carving Tools like these.
- Crucible to melt your material in & tongs to handle it.
- Gloves to handle the tongs with.
- Cuttlefish bones – you can get them locally at a pet store or other source or you can get them online here.
- Jeweler’s torch like this one.
When flattening the two halves of the bones (which we will get into and describe below) it will produce some fine dust particles so it’s a good idea for you to wear a mask during this process.
Of course, if you’re using any sort of metal, gold or silver in the casting process you will want to make sure that you’re using the proper safety gear like eye protection, gloves, proper clothing and so on. You don’t want to burn yourself in the process of trying to cast your piece of jewelry.
The Cuttlefish Casting Process
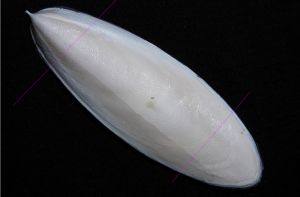
Once you’ve purchased your cuttlefish bones, you will need to inspect them to make sure they don’t have any cracks in them.
After you’ve done that you will need to trim both ends of the bones flat (see the pink lines in the picture below) and then cut bone in half to you’re left with two pieces that are the same length.
Once you’ve cut the bones in half, you will need to flatten one surface on each piece so that they fit together. You can do this by rubbing the soft part of the bone halves together and then sanding them.
You want both surfaces to be completely flat without any high spots when you put them together so that they form a tight seal when pressed together.
After you’ve done this, you need to make a few marks around the outside edges of bones so that you can line the marks up again when you put them together to ensure it goes together perfectly.
Now you’re ready to create your pattern or mold by pressing into and carving your design into both pieces of the bone.
You can either go at it freehand with some tools or you can trace a design out on both sides of the bone and carve it out.
Using double sided tape can help you transfer your designs from one side to the other when using a template to trace around.
Start by sticking your design to one side of the bone and trade around your design, then put double sided tape on the design and press the other half of the bone ontop of your design – making sure to line up the little marks on each side as you do.
Then take the bones apart, and the double sided tape should have made your design stick to the other bone, allowing you to trace around your template on the other side.
Now you can carve out your design on the opposite side and complete your final carving and finishing for the cast.
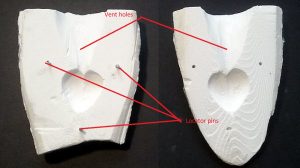
Once you’re happy with your design, make sure you add vents and a main spout so you can pour your liquefied material into the mold and air can escape through a vent. It’s also a good idea to add pins to help bring the halves together accurately so it helps fix the halves together and locate them properly.
Remove your design and begin final carving if needed.
Remember that your liquefied material will take on the surface finish of the inside of your mold. So if the inside is rough or has any sort of serrated edge or pattern it will be transferred onto your final part.
Once you’re happy with everything, put the two halves together and wire both sides together using some light wire – like 24 gauge wire.
It’s important to keep in mind that the parts have to come together tightly in order to keep your liquefied material from flowing out of the mold.
Now you’re ready to heat up and liquefy your material and pour it into the mold.
Most of the time this is used for casting silver or gold jewelry but it can certainly be used with other materials – basically anything that will flow into the mold.
If you’re using the mold with silver or gold, the cuttlefish bone (now the mold) will be destroyed due to the heat as I’ve mentioned before. So you can’t reused the bones.
Once you’ve poured your design and removed it from the cast you’re ready to clean up your final design.
DIY Cuttlefish Casting Jewellery
As this technique is quite easy & inexpensive to try it really opens up a lot of different options for DIY’ers looking to make their own molds and cast their own small parts and or jewellery.
One thing to remember if you’re doing this sort of casting process is that if you use any sort of liquefied metal or alloy in the mold or cast you’ve made, the mold will be destroyed.
This is a one-time use process when using those sorts of materials as the heat generated from the metal will burn and destroy the mold.
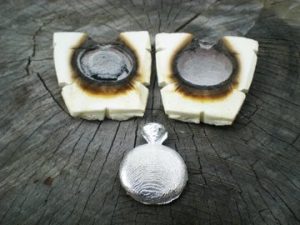
Another thing to keep in mind with this (as with any casting process) is that the liquid material you pour into the mold will pick up as you can see in the picture below.
Leave a Reply