Making Molds & Casts – Creating Unique DIY Projects Through Part Casting
Making a cast of an object involves pouring a material into a mold and letting it harden. Metal casting requires heating the metal to convert them into liquid, molten material which can be poured. Many casting enthusiasts perform these ancient crafts as a hobby in a DIY workshop called home or hobby foundry. Such creative people either create DIY projects with part casting to fulfill their artistic desires or to make unique, custom parts which are difficult to find in markets. Mold making and casting at home enables you to get a variety of metal items including home decor, automotive parts and jewelry without having to spend much. Some of the links on this page are affiliate links and as an Amazon Associate I might earn a tiny amount from qualifying purchases if you end up buying something through one of them.
Here is a detailed, comprehensive guide on making molds and casts to create unique DIY part casting projects. You can also see our articles on Metal Casting at Home – A Getting Started Guide and Aluminum Casting at Home – DIY Alumium Foundry & Molds for even more information on the subject.
Page Content Navigation
Molds and Casts – Creating the Mold
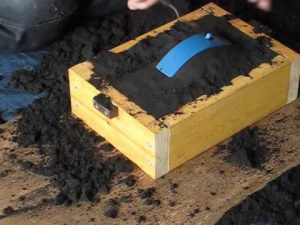 The first step in creating a mold is to get a two-piece mold frame constructed out of iron, wood or any other solid material. The frame should be the size that holds the object you have chosen for casting.
Place one of the frames on a working surface. Put the casting object in the frame’s center and make sure the flattest side of the object faces the surface. Some of the most popular casting items include pipes, gears, coins, figurines and trophies.
Before you pour any material into the frame, sprinkle parting dust over the object you have chosen for casting. This prevents the molding material from gluing to the object to give you a refined mold.
Get a container filled with molding sand and put some water on it. Create a semi-dry paste of the sand by tossing it with wooden blocks. You can consider tossing the sand 12 hours before casting to give time to soak enough moisture.
After tossing the sand, pour it into a riddle and sift to the frame. Cover the casting object and tamp it using your hands to preserve the pattern. Pour additional sand into the mold to make sure you fill well above the top border of the frame.
Bind the molding sand by pressing rammer end and twisting it from one side to another. After tamping the material well, scrape off excess sand using an edge. The top of the mold should be smooth by now.
After tamping the sand down, cover the frame with a board and flip it over with care. Place the other half of the frame on the current mold.
Repeat these steps to create the other half of the mold. This time, cover the open side of the object with parting dust, fill the cast with sand and bind the sand to create a smooth surface. Once you are done, pull the two mold pieces apart carefully.
Adding Sprue Hole and Riser Holes
Use a dowel rod to create sprue hole. Push the rod into the molding sand next to the casting object. Pat the dowel rod in the sand to create a hole with a width of about 1.3 cm running from one end of the mold to another. This hole will be used to pour the liquefied metal into the cast.
Use a chisel to create a shallow, small passage between the sprue hole and the object. This is called an in-gate and allows the molten metal to flow through it to reach the cast.
Now is the time to create riser holes. Use the dowel rod to create one or more small holes in the sand and connect them to the in-gate. These riser holes give place to the excess metal to go in case the metal starts shrinking.
After creating the sprue and riser holes, it is the time to remove the object from the cast. You can tap the object to loosen it if necessary. Pull it out of the mold carefully. The sand is soft at this time, so take caution while handling the object.
Casting the Part
When working with molten metal, safety should be ensured so put on leather boots, leather gloves and protective goggles.
Make sure the central casts line up with one another by pressing the two sides of the mold frame together. Toggle the locking mechanism of your frame to check that everything is in place.
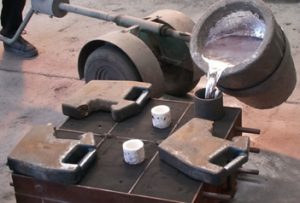
The next step is melting your metal in a crucible furnace. Fill the crucible with the metal of your choice – brass, bronze or aluminum and cover the crucible with the lid and place it in the containing hot coals. Once all the metal melts, you should wait for three minutes for aluminum, five minutes for brass and ten minutes if you are using bronze.
Now, you can pour the metal into the casting mold. To do this, remove the crucible lid and use a spoon to remove any un-melted metal. Lift the crucible using a hook and place it on a frying pan. Hold the crucible with tongs and carry it to the mold. Next, pour the metal carefully into the sprue hole of the mold.
After pouring the metal, wait for about 30 minutes to let the cast cool off. If you are casting a tiny object like a coin, it can take lesser time to solidify.
Once the metal has cooled down, quiver the frame and break up the sand. You can remove the new part you just cast and brush off any excess material on it.
I hope this guide about mold making and metal casting helps you cast your favorite parts at home.
Metal Casting Kits & Setting Up a Home Foundry
Now, to get started, you will obviously need a few things to get going.
Home forges like this one are really inexpensive and another bonus to them is that they’re ready to go rather than you having to design and make them. Take it from me – if your goal is to cast parts then you want to get casting parts asap and adding yet another DIY project to your list (IE making your own forge) before you can get started only delays the process. And in my experience adding more projects to your original intended one is a sure recipe for leaving both projects unfinished 🙂
So I highly recommend just buying one and moving on with your life.
Leave a Reply