DIY Lampshade from Scratch – Supplies, Kits & Ideas
Page Content Navigation
DIY Lampshade from Scratch
A DIY lampshade from scratch or fixing an old one isn’t quite as hard as you might expect.
And one of the nice things about this is that you don’t need a lot of expensive tools to do this.
In fact, you probably have almost everything you need to get started already.
Lampshade Making Kits – Getting Started
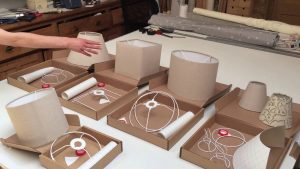 A great place to start is to go ahead and get a lampshade making kit.
That being said, you need to take a minute and actually figure out what you will need in the kit so you don’t end up buying parts you won’t use.
If you already have the lamp base complete with a harp, then you won’t need to purchase a kit with a harp.
Some kits include the wiring as well, but as I said before, if you already have a working lamp base, you won’t need this either.
Really, the first thing you need to do when looking to start this project is to decide exactly how big a shade you want to make.
Measure out the diameter and height you want it to be and that will determine exactly what you will need to buy.
Typically you will just need to buy the rings, adhesive styrene and the fabric you want to use for your shade. Some of the links on this page are affiliate links and as an Amazon Associate I earn a tiny amount from qualifying purchases. It’s literally a few cents.
DIY Lampshade Supplies
You can go out and buy lampshade making kits but before you do, let’s go over the basic basic list of supplies you’ll need if you’re going to go the DIY route:
Tools:
Iron & suitable surface to iron on
scissors
A cheap paintbrush to apply glue with
A ruler or flexible measuring tape
Something to mark with like a pen or pencil
Clips to hold the lampshade in place
If you really want to spend some money and get fancy you could get a rotary cutter and a cutting mat, but this can all be done with a good pair of scissors.
Not that I want to discourage you from getting cool new tools 🙂
Supplies:
Glue
Lampshade rings
Adhesive styrene
Fabric for covering the shade
For the lampshade rings, you will want to get either a euro style ring or the spider/washer style ring.
The euro style ring is used on lamps with electrical sockets that have threads on the outside – so the euro style threads on to the base of the light socket.
The spider/washer style ring is the most common style for Canada and the USA and are generally used for any lamp shade that has a harp.
Let’s Get To It
Step 1: Cutting
The first thing you want to do is cut your styrene and fabric to size.
When calculating the length of adhesive styrene you need to purchase, you are going to be limited to whatever stock sheet size they have.
But to calculate exactly what you need, you need to get the circumference length of the ring you purchase plus about an inch.
So the calculation for the length would be the ring diameter x pi plus one inch.
An example would be 12″ diameter ring x 3.14159 + 1″ = 38.699″ give or take.
The width of your styrene will be determined by how far apart you want to place the rings for your shade.
And then for the fabric, I typically just trim it to suit once the lampshade is built but it’s often 1″ wider and maybe 1/2″ shorter than your styrene.
I’ve found that linens, silks or cotton based fabrics tend to stick the best to styrene whereas more synthetic materials don’t stick as well.
Step 2: Creating the Drum
Once you’ve cut both pieces, you want to slowly peel back the paper off of the styrene bit by bit and begin to attach the fabric to it.
Once you’ve got the pieces attached, you can begin to roll them into a circle to fit the diameter of your rings and glue the long ends together.
I recommend using the clips to keep the rings and the styrene and fabric in the correct shape as the glue dries.
Now it’s time to attach the rings.
Place the first ring about 1/4″ down from the top of the extra fabric at the top and put glue on the material above the ring.
Now fold the material over the ring until it touches the bottom side of the ring or until it’s on the styrene just below the ring.
Use the clips to hold the ring in place as you go.
Then let the glue dry and then repeat the same process for the other side.
Remember, you can always trim the material if you have too much.
Tip: I use a dull knife to tuck the material up and under the bottom side of the ring so the fabric wraps around the ring in a complete circle (or as close as possible) to help hold the ring in place once the glue dries.
If there is space between the fabric and the ring on the back side, it can allow the ring to shift, making it uneven.
It is important to keep the ring as perpendicular to the lamp shade as possible – so it is completely level.
You don’t want a crooked shade 🙂
Now, although this is a fairly simplistic and straightforward process it does take a little bit of practice.
But if you take it slowly your first shade can turn out great.
You don’t need to be afraid of making a diy lampshade from scratch or re-purposing an existing shade in order to create something amazing.
Go ahead and experiment with different materials and styles like I did with this nautical themed lamp.
West Elm Lamp Shades & Other Inspiration
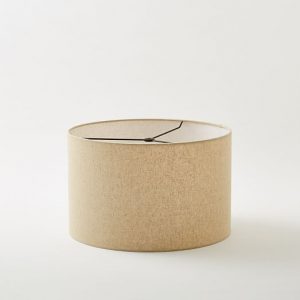 If I’m looking for some sort of inspiration, I will head over to a site like West Elm and look through some of their lamp shades in order to get some new ideas.
They’ve got quite the selection of styles ranging from modern to more classic styles so it’s a great place to start.
So you can go to a site like that, or you could head over to Pinterest and get some visual inspiration.
Here is a shade that I made on my nautical themed lamp. 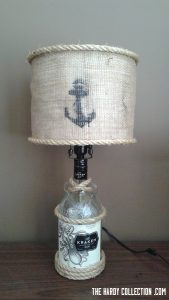
I followed the same process I outlined above, but instead of using fabric, I used burlap and finished the edges using rope.
To complete the theme, I drew and cut out the anchor from cardboard to create a stencil and then spray painted the anchor onto the burlap.
I spray painted the anchor onto the burlap before I attached it to the shade so that the stencil would sit flat and it would be easier to paint.
Leave a Reply