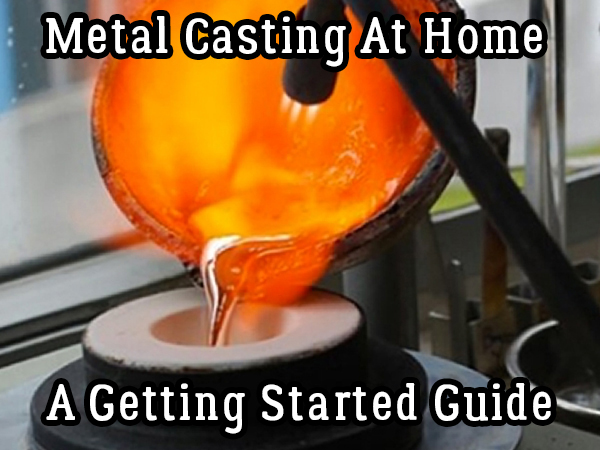
Metal Casting At Home – A Getting Started Guide
If you are intrigued by the thought of metal casting at home, we’ve written this guide to help you get started and bring your creative ideas to life. In this article, we explain in detail how you can make your own home foundry to cast metals and create parts. A large number of hobby metal enthusiasts setup hobby foundries to cast metals to make special components or just fulfill their creative desires.
A home foundry can be setup easily using the materials which are easily available. Metal casting at home is a really simple process which can be mastered with a bit of practice. It can be used to create almost anything – with your imagination and skill being your only limitations. Casting metal at home will allow you to make special project parts, vintage motorcycle parts, old workshop tools and machine parts and antique restoration parts. And the list goes on. Some of the links on this page are affiliate links and as an Amazon Associate I might earn a tiny amount from qualifying purchases if you end up buying something through one of them.
Page Content Navigation
Casting Metal At Home – Setting Up a Home Metal Casting Foundry
It is quite easy to make a compact foundry at home as you will find most of the things around you. Metal casting is fun and exciting and does not require special skills. The materials and equipment needed for a compact foundry are available readily and are inexpensive. You can build a furnace out of the scrap around a workshop to melt your metal. It can be as simple as a drum with a removable lid, lined all around with nearly two inches of refractory material, featuring an air-feed tube at the bottom and equipped with adjustable blower to supply the material needed to create extreme heat. You can use charcoal as the fuel for your furnace.
The second component for the foundry – the flask – can also be made yourself. It can be a two-part open-ended box holding sand that forms the mold. The flask size can be determined from the size of the castings you are about to pour.
Next, you need a riddle and a molding mench and both are simple to make. The riddle is just a sand filter and can be created by nailing a frame and a cloth together. The moding mench is a wooden frame having a plywood bottom. You can also make two pattern boards easily by cutting plywood sheets bigger in size than your flask and coating them with sealer.
You need some casting sand and pumice dust as well. Other materials can be readily found in the kitchen.
Now, while it is possible to setup your own foundry, it’s really quite inexpensive to buy one to start like this one. For me personally, with all the things that can go wrong with making your own forge I’d recommend just buying one. Propane can explode, and you’re dealing a lot of heat when casting!!
Making a Metal Mold
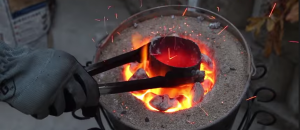 Now you are all set to make a mold. First of all, clean the briquets and place them in the furnace. Ignite them and turn on the blower. Now prepare the crucible by filling aluminum scrap. When the coals are hot, put the crucible in the furnace and put on the lid. While the metal melts, you can take your molding mench and add five gallons of sand. Sprinkle water into it gradually and toss it to make a paste-like consistency. It should remain whole upon squeezing but should break when released.
Now, place a pattern on the board on the molding bench and dust it with the pumice. Place the drag upside down on the pattern and sift the sand into the drag. Use your fingers to pack the grains around the pattern. Pour coarse sand on the top. Using a pattern board, compress the sand into the drag. You can check the metal in the furnace to see if it has melted. Now you can flip the drag the other side and re-dust the face. Pierce on the thickest part of the pattern and sift, tamp and strike to complete the process. Vent the mold by piercing the sand and separate the cope from the drag. Now you can remove the original by threading a small screw into a convenient part. You are now ready to make the pour.
In some cases for simple wood forms filled with sand with the shape of your part hollowed out.
Using the Metal Casting Furnace & Pouring the Metal Casting
To pour the metal casting, open the furnace and clean the crucible using a hook and skim the slag out of the surface of the molten metal without disturbing it. Throw into an iron receptacle. Take the crucible from the furnace using a hook and set it in an iron frying pan grabbing it firmly with tongs. Now pour the metal into the basin and sprue until it comes out of the riser, dump unused fluid metal into the muffin pan for later use.
After the time is up, look at the casting and shake it. With the first try, the casting may not be perfect. You can practice to achieve mastery in works suitable for turning, tapping, milling and machining of any kind.
Safety Instructions
- It is advisable to wear leather boots and gloves and protect the eyes when working with foundry. Don’t ignore this – if you don’t have the proper heat resistant gloves you need to get some or you could seriously burn yourself. You can get them pretty cheaply here.
- See that you never pour water on any molten metal. You can use sand to prevent or deal with fire.
- Always work in outdoor area or in a ventilated space. See that you don’t breathe metal fumes and charcoal smoke as they are toxic.
- Never pour over bare concrete or wood and don’t ever set the furnace on a wooden floor. Raise it up on a refractory or firebrick.
- Keep water out of your foundry as water can cause an explosion in the metal.
With this DIY tutorial to metal casting at home, you get enough information to start making metal casting at home. Though you might not make the perfect piece the first time, you can practice to master the process. You can also read about home foundry and metal casting to become proficient enough at one of the most amazing self-sufficiency skills. 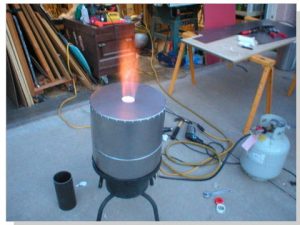
Leave a Reply