Amazing Distressed Wood Frames DIY
So, you’ve seen some amazing distressed wood frames DIY projects and now you’d like to tackle one, would you?
Great! They aren’t that difficult to do (as long as you have the right tools) and they can look absolutely fantastic!
And the principles are the same whether you’re making a distressed wood mirror or some large rustic wooden picture frames.
Page Content Navigation
What You’ll Need to Make Rustic Barnwood Frames
So here is the list of tools you need to make the frame. If you’ve done a bit of woodworking before, chances are you’ve already got some of these tools. If not, you can always pick them up through the links below. And yes, some of the links below are affiliate links and if you purchase something through them I might make a small commission from it as a result.
*Table Saw
*Mitre Saw or Skill Saw. The mitre saw makes this much easier of course, but if you’re able to make straight cuts you can get away with just using a typical hand held skill saw.
*Router. This is optional. You can set up the table saw to make the rabbit cuts or you could use a hand held router or router table to make the cuts.
*Tape Measure
*Old Barnwood
*Wood Glue or instant bond glue
*Small Brackets
*Small wood screws to mount the brackets to fit the small metal brackets you’ll be using.
*A mirror or glass for inside of the frame depending on whether you’re making a mirror or a picture frame.
*Biscuit Joiner & biscuits. This is optional as well. I used the biscuit joiner to join all the parts together but you might be able to get away with just using the brackets.
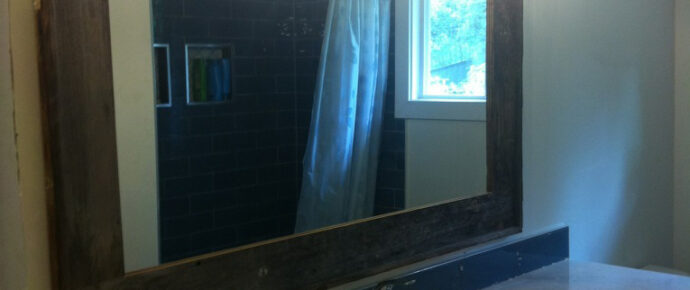
The Barn Wood Mirror DIY
Ok let’s get started with the barn wood mirror DIY project.
The first thing you need to do is to decide on the size of the mirror or picture frame you want to make.
Then buy your mirror or glass.
Do not start until you have the piece of mirror or glass so that you can verify the measurements before you start cutting your wood.
From there you can do your layout.
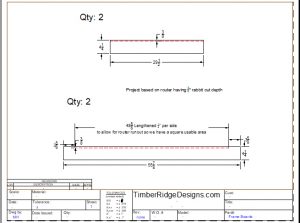
I wanted about 4.25″ of wood visible all the way around the mirror, so I ripped down the barnwood top and bottom pieces to 4.25″ wide on the table saw.
Then I cut them to length on my mitre saw.
For the rabbit cut, you can see that I made it about 3/8″ deep (the red dotted line) to receive the mirror all the way around.
Then you need to measure your mirror thickness and subtract it from the overall thickness of the barnwood to determine your width of cut. See the side view image for clarification.
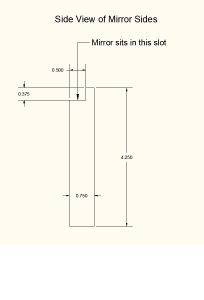
Please note: this rabbit cut doesn’t run the entire length of the top and bottom pieces – it stops short so that when you but the vertical sides into that edge, you will have something to screw the brackets to. This cut runs the full length on both of the vertical side pieces.
As the cutter for the router bit is round and won’t cut a perfect 90 degree angle, you will have to run it a little bit past where the corner of the top and bottom pieces meet the vertical pieces to ensure the corners of the mirror will sit in the slot.
You can try to make this rabbit cut using a table saw or skill saw, but it’s a little more difficult.
For me, it was a lot easier to just get a small router and do it.
I also found it was helpful to use some masking tape and mark off the area where I was trying to make the cut.
So I just put some masking tape where I wanted to make the cut and then used a pencil to mark where I wanted the router cut to begin and end.
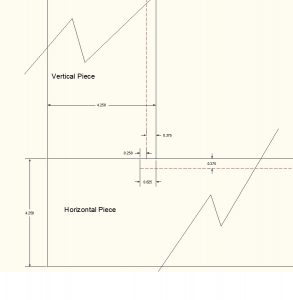
By doing this, I could mark where the vertical pieces would butt into the top and bottom pieces and then could see how far I needed to run the router past in order to accommodate for the corner of the mirror.
I think for me, I had to add about 5/8″ past where the vertical pieces butted into the horizontal pieces (3/8″ for the relief on the vertical pieces plus 1/4″ or so for the router bit to cut past).
See the picture below for clarification.
Once you’ve got your top and bottom pieces cut then you can cut the vertical side pieces to size, do the rabbit cut on them and then you can put them together.
For fastening them together, you can join them using the biscuit joiner or small metal brackets. Or both.
Make sure you use the wood glue as well. Cuz we wants it super strong.
At this point, we’re pretty close to being finished!
Final Steps for Your Large Rustic Frame
Once you’ve assembled the frame, you can rip some strips to go around the outside border and hide the edges.
I made them a little wider than the depth of the frame so that they stuck out a bit for some visual interest – see the picture below.

Then cut them to length for the frame and either glue or biscuit join them to the frame for a nice outside border.
I ran the horizontal strips short and the vertical strips past so that it hid the cut ends when you were looking on the side of the mirror. You can see where the vertical strips run past on the drawing below.

Once you’ve done this you can mount your mirror or glass in using either brackets or little nails to hold it in place and you should be done.
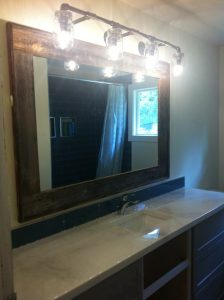
Voila! An amazing large rustic wood frame!
Now, if you want to complete your bathroom makeover, you can check out our articles showing you how to make your own cabinets (DIY Storage Cabinet – A Simple Cupboard Design) and your own epoxy countertop (DIY Epoxy Countertops – The Perfect Solution for Resin Worktops).
Leave a Reply