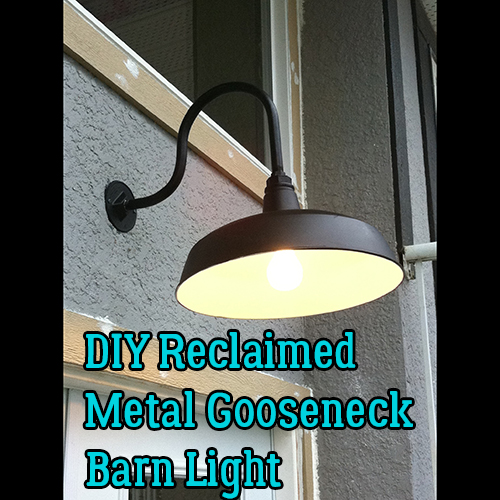
DIY Metal Gooseneck Exterior Barn Lamp
If there’s one thing I love it’s designing something in a simplistic way, using common off-the-shelf parts that are easily accessible.
I think it’s great when you can design something really cool and intricate, but if it takes super-specialized equipment to do (and super-specialized usually translates directly into being super-expensive) it’s often out of reach for the average person one a DIY budget.
Don’t get me wrong – specialized equipment and out of this world unique design is all kinds of awesome but to get great results and at a fraction of the cost using common parts just seems like good design to me.
But enough about that – on to a great rustic gooseneck barn light.
You’ve probably seen these all over the place as they’re in style right now.
And I love the look so I wanted to get my own.
But the only options I found around my budget were ones with weird finishes and most were made in China.
So rather than spend money on something I might not be happy with I decided to investigate making my own.
I started by visiting a used junk store up close to our cabin and I found this beauty:
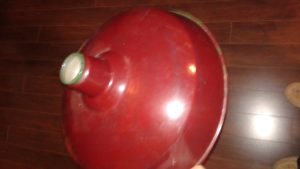
And it was salvaged off an old barn before it fell down.
But – as you can see – there was no hardware or any sort of fastening system that came with it.
And so began the journey of constructing our exterior metal gooseneck barn lamp.
I started by looking for a pre-made bent gooseneck but the only ones I could find were close to $80USD – which was pretty close to what I saw brand new complete lights selling for.
So I decided to fabricate my own.
And so began the journey.
So let’s dive into how you can go about doing the same. Some of the links on this page are affiliate links and as an Amazon Associate I might earn a tiny amount from qualifying purchases if you end up buying something through one of them.
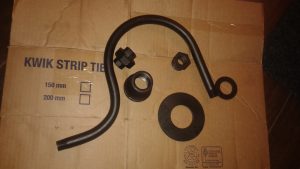
- First of all, you’ll need the following materials:
- 1/2″ Pipe threaded union
- Electrical wall plate with 1/2″ npt thread
- 1/2″ Sch 40 steel pipe threaded both ends
- 1″x 1/2″ steel hex bushing
- 2.5″x 1″ steel reducer coupling – – ** Will vary depending on your lamp shade size **
- 1.25″ sae flat washer (1.375″ID x 2.5″OD) – ** Will vary depending on your lamp shade size **
- 1″ SAE Flatwasher (1.062″ID x 2″OD) – ** Will vary depending on your lamp shade size **
- 1/2″ x 2.5″ steel pipe nipple
- Plumber’s tape
- Electrical wire to suit your application.
To start, you will need to figure out how far away from the building you want your lamp to hang.
This will be dictated by the size of the barn lamp shade you’re using and beyond that it will just depend on the look you’re going for.
If you’re going further from the house, you can use a larger bend radius or a more gradual curve if you’d rather.
Here is what I did:

You can get a printable PDF of the above image by clicking here if it makes it easier for you.
If you like the look, you might be able to just add to the straight section of the end (2.74″) on the drawing in order to push it further from the face of the building.
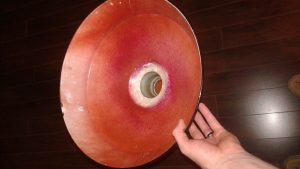
A good portion of this build will depend on the barn shade you’re using and it’s dimensions.
Page Content Navigation
Step 1 – Pipe Work
Decide on the radius of the curve you want and figure out your cut length for the pipe. Then cut the pipe and thread both ends.
If you don’t have a pipe threader, go to your local plumbing supply store and ask then to cut you a piece of thread and thread both ends.
Then mark out the straight section of pipe using a bright colored tape to determine where you want the bends to begin and end.
Then bend the pipe. If you have a pipe bender or can take it to a shop that does, then you’re in luck. Plumbing supply places sometimes have conduit benders so they might be able to help you with the bending as well.
Failing that you could buy a 1/2″ conduit pipe bender or go ahead and get an awesome little floor bender that will let you bend all kinds of great stuff like this one.
The little floor benders are pretty versatile machines so if I had to choose, I would invest in a floor bender and get a die that works – it’s something you’ll end up using a lot more often than just a conduit bender.
Be warned though, you will need to generate a lot of force in order to bend a piece of pipe this short.
If you don’t have a pipe bender and your local plumbing suppliers can’t help you, you’ll have to rig up a jig where you can hold one end stationary while slipping a snipe (larger piece of pipe/tube) over one end and bending the pipe around an object to give you the desired radius or bend you want.
If you have to do it yourself, fill the pipe full of dry sand, use two 1/2″ pipe caps (one for each end) to cap each end to keep the pipe from distorting and crushing as much as possible during the bending process.
Using a torch to heat the pipe during the bending process will help a lot.
Step 2 – Hardware Selection
Now that you’ve got the gooseneck for your lamp threaded and bent, you need to measure for what size washers you will need.
For the top washer, you need something with an inside diameter big enough to let one end of the 1/2″ bushing to pass through it, but not so big that the large nut part of the bushing can fall through. The outside diameter needs to be big enough to extend to the outside edge of your farmhouse lamp shade.
When it comes to the bottom washer, you need something with an inside diameter large enough to allow the 1″ coupling end through, but small enough to stop the 2.5″ bell end of the reducer coupling from going through it. The outside diameter need to be large enough to fit inside the bottom of the neck of the farmhouse lamp shade.
You may need to use something other than the 2.5″x1″ reducer coupling and if so the size of washers you use may need to change as well.
The idea is to get all of the pipe parts to have the washers keep all of the pipe parts connected and tight, while using the top and inside of the lamp shade as stops that you can thread the parts against in order to keep everything assembled.
Step 3 – Test Fit & Paint
Once you’ve got all the parts go ahead and test fit them to make sure they all fit.
When you’re happy with that, go ahead and clean the pipe and lamp shade and paint everything as necessary.
I got lucky as when I cleaned my lamp, the red came off and I was left with a nice white interior which I just freshened up with a little more white paint.
I chose a matte black for my lamp.
Step 4 – Wiring
Get your electrical wire and cut off a lot more than you need and run it through the gooseneck bend first.
Then install the wall plate on the end of the gooseneck with the straight run on it. You can use plumber’s tape to tighten the joints and prevent moisture from entering the pipe.
Starting with the lampshade end, slip the 1/2″ coupling and slip the top flat washer onto the bottom of the coupling.
Put the lamp shade up against the bottom side of the flat washer.
Screw on the 2.5″ pipe nipple (the length of this pipe nipple will depend on the size of your lamp shade).
At the bottom of the 2.5″ pipe nipple, install the 1″x1/2″ hex bushing.
Then place the bottom washer ontop of the 1″ end of the 1″ x 2.5″ reducer coupling and screw it onto the hex bushing.
Make sure everything is tight and then you can use some clear silicone to seal the edge around the top bushing and top washer, and then the top washer and the top of the lamp shade.
Once you’ve done that, you can wire up your light socket and connect the wires to the power source. If you aren’t confident please have an electrician install your lamp.
Then you just need to screw the wall plate on to the electrical box and use some clear silicone to seal between the wall and the wall plate.
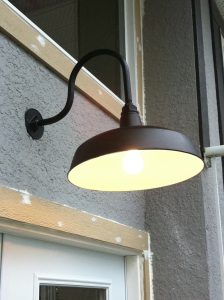
Step 5 – Enjoy
Test and enjoy your awesome new lamp!
In all, I think using the commonly available hardware you can get this whole project done for less than $50 if you’re able to put a bit of work in.
And the results are great!

Leave a Reply