French Country Chandelier – The Easy DIY for Rustic Light Fixtures
If you’re interested in getting an amazing french country chandelier, you’ve come to the right place!
And after all, why wouldn’t you want a french country chandelier? They’re incredible!
They’re certainly at the top of my rustic light fixture list!
But there’s a catch. (Of course, there always seems to be one, doesn’t there?)
And the catch is that they’re often pretty expensive.
But we can fix that with this simple DIY project.
Page Content Navigation
The French Country Chandelier DIY Project
It all started out with my wife browsing the old interwebs.
She was probably on Pinterest at the time.
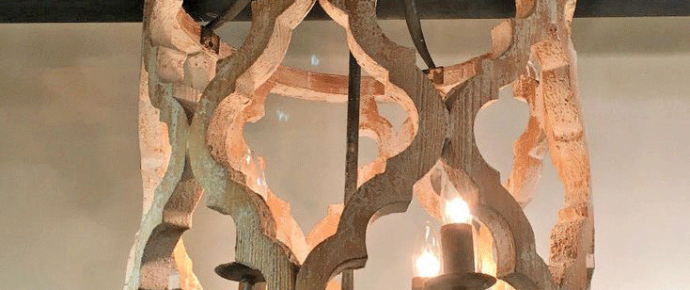
And she came upon an amazing looking french country chandelier.
Just look at this beauty of a rustic chandelier!
The only catch?
I think at the time it was about $600 USD. (Which was about 25% more expensive for us Canadians, eh?)
So what’s a guy to do?
Well, there are only a few options.
Option #1: Pay up.
Option #2: Go without.
Options #3: DIY
So we opted for option number 3.
Let’s get started on this project.
The Rustic Light Fixtures DIY Project Materials and Tools List
There are a few things that you’ll need in order to do this project.
And wherever possible, I’ve tried to include links to where you can buy them online in order to save you some time.
Oh, and some of the links might be affiliate links so if you buy through them I might earn a small commission.
It doesn’t cost you any more but it helps but a few more cents towards our next DIY project.
So without further ado, here’s the list:
- Jigsaw – This is a crucial tool on this project. If you don’t have one, you won’t be able to follow along. I recommend using a cordless one. Otherwise you can end up stepping on the cord as you’re cutting and it can ruin your cut.
- Jigsaw Blades. I could’ve left this one out, but having dull jigsaw blades is terrible. I like this set that comes with a hard case. That way I can just throw the whole case in my bag and it’s all there.
- Plywood. For this project, we used basic 3/4″ plywood. Nothing fancy there.
- Wood stain. I recommend picking up at least 2-3 small tins of different stain colors for your project. You’ll want to do some samples before coating your final project.
- Glue. You can use regular old wood glue if you want. But for me, I always use InstantBond. The stuff is freakishly strong and bonds within a couple seconds. I couldn’t believe how fast it cured once sprayed with the activator. One time when making cabinets (see this post here), I accidentally place a piece of trim in the wrong spot. Well, in trying to pry the two pieces of wood apart I ended up de-laminating the plywood. The stuff just wouldn’t let go.
- Table Saw. You might be able to get away with just using the jigsaw. But it will make things a bit easier when you go to rip an angled cut on the curved sections of the chandelier.
- Drywall mud or spackle. We used this to add a bit of a shmear look to ours. But you can leave this off if you’d rather just paint or stain it.
- Router. You’ll need either a hand-held router or a router table. Using a router table will make your life easier. But you can do it with a hand-held if you need to. I find a router table makes your life a lot easier. You don’t need it for every DIY project you do. But when you need it, it sure makes life a lot easier.
- Double sided tape. You’ll use this to fasten your template to the wood parts you’re cutting. More on this later.
That’s about it. Other than that we’re ready to get started and design your lamp.
The Design Process
Basically what you need to do is figure out the size and shape of your inner sections of the chandelier.
Luckily for me, I use Autocad to design and lay these sort of things out.
It makes life a lot easier for me rather than trying to do maths.
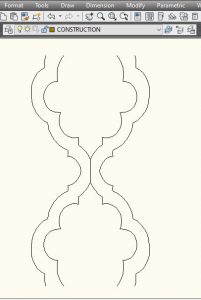
For me, I drew out the general shape of the inner parts and scaled it to the height that I wanted.
I ended up with something like this:
Once I had the general shape done, I created a cut file for one of the sides and had it laser cut out of steel so I could use it as a template.
Then I laid out how the chandelier sides would all look so I could figure out how many I wanted. This was all based on the approximate width of the chandelier I was looking to make.
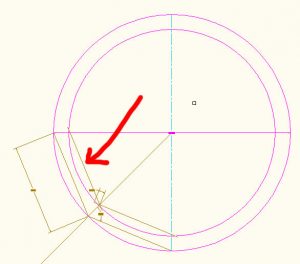
I also drew the circle you see above and had a steel ring laser cut as well. (So I could use this as a template to cut my wood rings exactly.)
Once I had the templates back from the laser cutter, I traced around the templates on the plywood and then cut the shapes out with the jig saw.
But when I cut the shapes out, I left about 1/8″-1/4″ of extra material on each side.
By doing this, I could fine-tune the shape and get it exactly by using the router table.
Once I had my over-sized shapes cut out, I used 2 sided tape and fastened the metal template ontop of one of the shapes.
I then used a straight cut router bit with guide bearing to follow the contour of the metal.
This way, the router would remove the extra 1/8″x1/4″ of wood.
I repeated this process for both top and bottom rings as well as all of the side chandelier pieces.
Then I went back to Autocad and found out what angle was where the inside edges of the interior chandelier parts joined.
I set the table saw as close as I could to that angle and cut the middle sections so they joined at the correct angle.
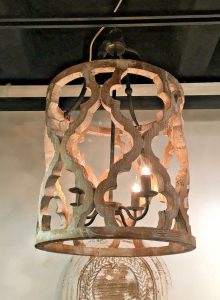
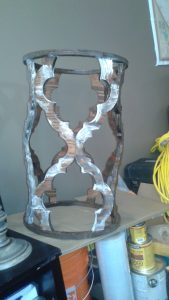
We then glued the pieces all together and came up with this:

I highly recommend getting someone to help you when you’re gluing it all together.
The Manual Alternative
If you don’t have a laser cutter (or don’t want to pay for a piece to be cut), there is another way.
You can do it manually.
For this I’d recommend you draw out your shapes on cardboard and cut them out.
Then make a wooden template out of 1/2″ plywood for the parts.
Use the 2 sided tape to cut your templates the same way.
It might be a bit trickier to figure out your angles and how big to make your rings, but with a little patience I’m sure you can get it.
Finishing The Project
Once it was all together, we stained it and added the drywall mud to it.
At this point you may be wondering… but what about the light fixture itself?
All we did for that was steal the lightbulb holders from an old chain light.
I then hand-bent some 1″ wide steel flatbar to shape and fastened it to the top of the wooden chandelier part.
From there, you could use a chain to hang it, or you could use threaded rod (available here).
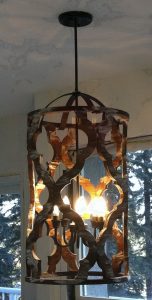
We finished everything off with some black spray paint, and, “Voila!”
Final Thoughts on the French Country Chandelier
Overall, we think this turned out great.
In fact, we regularly get a lot of compliments from our neighbors and people who see the chandelier from the street.
But this project allows for a lot of different customization in terms of the overall design, look and feel of it all.
So you can make something to fit your space perfectly.
And now you don’t have to pay full price for a nice chandelier.
You can DIY and save your money!
Leave a Reply