
DIY Leather Jewellery – “Make A Style Statement”
DIY Leather jewellery is something that will never go out of style. It can be as fancy or elegant as the outfit demands.
Where store bought leather jewellery items are often costly, this tutorial will show you how to make stunning jewellery in few easy steps. The process is really simple and you get the benefit of wearing your own handmade, sophisticated piece of jewellery.
Leather is such a versatile material and there are numerous styles you can use when creating jewellery out of it. Making DIY jewellery is not just fun and exciting but it has an added benefit that you get to wear what you create. Possibilities are endless when you decide to create DIY leather jewellery. From designer-inspired statement necklaces to quick vegan leather bracelets, you can choose your own DIY project to create a masterpiece with just few tools. Some of the links on this page are affiliate links and as an Amazon Associate I might earn a tiny amount from qualifying purchases if you end up buying something through one of them.
Page Content Navigation
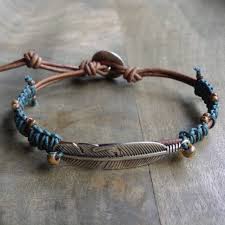
The Start to Your DIY Leather Jewllery – A DIY Beaded Leather Layered Bracelet
Here is a complete tutorial on making an easy multi-strand leather bracelet in glam meets boho style. It adds some shine and sparkle to any outfit and the process is really simple. Even beginners who can use scissors and adhesive would enjoy this DIY project. It needs some basic supplies and about fifteen minutes to get a statement DIY leather bracelet.
What You Need:
1 mm leather cord
6 mm round silver beads
Adhesive
Scissors
5 mm end caps
Cosmic bead assortment
Start by cutting five 8 inches long leather cord pieces. The lengths are more than what you need but it is easier to work with excess. Drop some adhesive into the inside of the 5 mm end caps. Gather the ends of the leather cord and press them tightly into the end cap.
Wait for few minutes to make sure that the glue has set to keep the end cap and cord together. Once the glue is set, start adding the beads into the cords. You can use a combination of large beads and 6 mm round beads. There is no need to follow any specific pattern to arrange these beads. The bracelet is layered and when worn, beads from different strands come together to create nice patterns.
Also, note that you need not add too many beads on every strand. Five to seven beads on each of the five strands can get you the desired pattern. The layered cords together make the bracelet full of beads.
Once you insert 25-30 beads into the cord, measure seven inches of the leather and gather the cords together. Cut and stick the other end cap onto the cords to complete the bracelet. The end caps can have extended chain that allows adjusting the bracelet to a convenient length when wearing it.
Let the glue dry completely before wearing the bracelet. The random placement of small and large beads gives a fabulous look to the leather accessory.
Starting a DIY Braided Leather Bracelet
 This is an elegant bracelet which can be made from three strips of leather cord. To achieve a more Bohemian look, you can use thicker leather strips. A leather cord can be used to get a polished look.
After selecting your material for the bracelet, it is the time to cut it. Wrap the leather around the wrist and measure the length to cut the pieces. Cut three strips out of leather with scissors.
Next, tie a knot at one end of the strips to secure them together. Then, attach the strands to a table using a tape or pin them to a pant leg with a safety pin.
Start braiding the strands by wrapping the right cord and setting it over the left cord. You can braid it in a fashion similar to that done with hair.
Take the far left piece and place it over the center to make it the new center strip. Move the piece from the far right over the center strip like the previous step. Follow the same pattern continuously to braid the strips until they reach a length that wraps around the wrist. Then, smooth out the leather wrap and flatten the braids.
Finally, secure the strands with a knot, remove the tape and tie it around your wrist.
You can even make some painted leather bracelets to enjoy the natural texture of leather combined with some character and color. If you like the idea of wearing leather bracelets but do not want a dark or edgy look, you can use details like gold studs to decorate delicately cut thin strips of leather for a prominent and sweet looking DIY style. You can even convert your old bangles into a stylish leather jewellery piece by weaving leather strings between them to create an intricately designed cuff.
Apart from bracelets and cuffs, DIY leather jewellery ideas can be used to make quick little earrings with leather pieces cut in your favorite shapes in contrasting colors for a trendy statement-making jewellery. A wide variety of necklaces can be made using leather to match the current trend while staying classy.
You can easily make bib necklaces by cutting leather in desired shapes and decorating it with other items like feathers. If you love tassels and leather equally, you can show your love by making leather tassels in your favorite colors and hanging them on a chain to get a statement-making neck piece. Use your creativity to make leather flowers in beautiful colors and crafting them to get handmade jewellery pieces like necklaces and earrings.
So, you see that making a DIY leather jewellery is not just fun but also simple. You can play around with whatever you have, try new ideas and see how you like things. You will surely come up with some great statement pieces that you will not just love for their look but for the fact that you made them. For more inspiration, see our post DIY Wooden Rings – How to Make a Wooden Ring at Home
Leave a Reply