
Dovetail Drawers – DIY With a Dovetail Joint Router
Page Content Navigation
Dovetail Drawers – DIY With a Dovetail Joint Router
Dovetail drawers have long been the standard when it comes to top-quality construction. Not all kitchen drawers are equal. Sure, they might look similar but there are some big differences when it comes to how they are made and just how long they will last.
And dovetail drawers offer more in terms of looks, strength, longevity and craftsmanship over any other type of joint construction.
As soon as people see a dovetail drawers, they know it’s top quality.
And you can do it yourself with a little guidance and practice.
Some of the links on this page are affiliate links and as an Amazon Associate I earn a tiny amount from qualifying purchases. It’s literally a few cents.
The Dovetail Connection – The Crux of it All
So what exactly are these things?
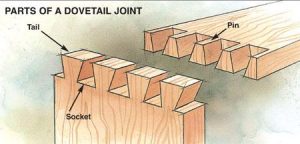
A dovetail connection is a specific type of locking joint where two separate parts are joined together using interlocking wedge shaped fingers that are cut into both drawer sides so that when they come and lock together, they form a box.
These little wedges are referred to “tails” and “pins.”
Because these parts lock together on their own, it creates a very strong joint while still offering a lot of surface area that you can glue when doing the final assembly.
With this strength, dovetail joints can handle heavier loads and if something on the drawer breaks, it isn’t usually the joint.
Besides that, they look awesome too.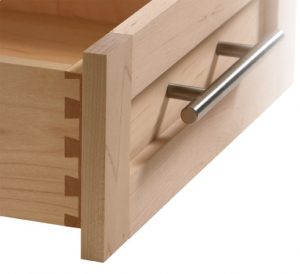
What You Will Need
- A dovetail cutter (IE a straight router bit & some dovetail router bits)
- Wood glue
- Wood – 1″x4″ & 1″x6″, 1/4″ plywood
- Soft Close Drawer Slides – make sure that you have both the drawer slides AND the quick release mechanism. Sometimes the quick release mechanism isn’t included and you need to buy them separately and if you forget, it’s pretty frustrating 🙂
When it comes to building, you need to have the proper tools for the job. Sure, some people try to spend as little as possible when it comes to buying tools but it can really come back to hurt you when you’re trying to make something as nice and precision as dovetail drawers.
Due to the precise nature of the joint, there isn’t a lot of room for error – which is why it’s important to use a good jig. 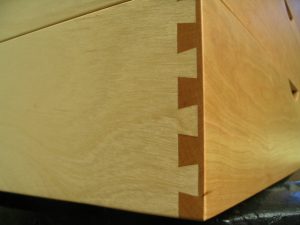
If you’re going to make these types of drawers, you’ve got to get a jig, router and cutter.
And if you aren’t willing to invest in that, then you should really try making a different type of joint for your drawers.
Now, when it comes to the wood size and amount, this will all be determined by the dimensions of the cabinet and drawers that you’re making.
Typical cabinet heights are 34.5″ (without countertop) and 24″-26″ deep (again without countertop). Standard widths are generally in increments of 12″ and are 12, 18, 24, 30, 33, 36, 48. But this is totally dependent upon the space you have and what you’re trying to achieve. The only real measurement I’d suggest you keep is the cabinet height and beyond that, you will have to design and built to suit.
So when building the sides for your drawers, it’s generally easiest to use stock lumber sizes – so use 1″x4″ or 1″x6″. If you use stock wood sizes, it eliminates the need for you to rip the drawer sides down to height.
Keep in mind when determining the height of your drawer sides that you will lose close to an inch of usable space on the inside because you’ve got to install the drawer base up from the bottom to allow room for the drawer slides to be installed underneath.
Once you’ve figured the height of your sides, you need to calculate the depth of your drawers and if you’re using the soft-close drawer slides the depth of your drawers will be determined by the length of the slides as they only come in certain lengths.
To order your drawer slides, you will need to know the type of cabinet style you’re making – either frameless or face frame.
Just so we’re clear – before you go to order your soft close drawer guides you need to know the style of cabinet you’re building (frameless or face frame) and the depth of the cabinet. Some soft close slides work for both styles of cabinets but you need to make sure before you buy them.
Once you’ve got your drawer guides, the instructions that they include will help you determine the width and depth of your drawers.
I would recommend waiting until you have the drawer slides before you go ahead and cut anything.
The Dovetail Cutter
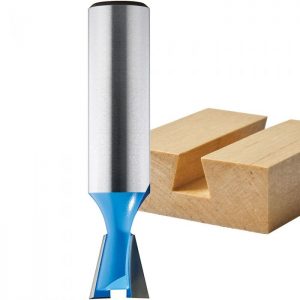 Dovetail cutters are specialized bits for cutting wedges in a work piece in such a way that you can connect two different pieces of material.
These cutters can have a number of different tip options from a chamfer, ballnose, square end or radius tip.
When you’re making dovetail drawers, you will probably end up using either a straight bit or a dovetail bit with a 1/2″ or 1/4″ shank depending on the specific style of joint you’re trying to make.
Before you go ahead and buy your cutter, I suggest looking at the templates/guides that came with your dovetail jig to determine the type of dovetail joint you want to create (IE half-blind or through) and what the manufacturer suggests using.
Either way I would highly recommend using a 1/2″ shank bit because it will stand up to use a lot better to heavy use.
You can get some great bits fairly cheaply here.
The Dovetail Joint Router – Where the Magic Happens
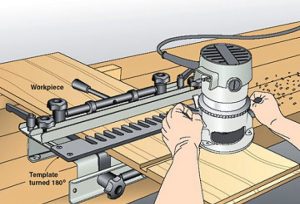 Using a dovetail jig will make your life a lot easier than cutting dovetail joints by hand. Especially if you’re doing the same joints over and over (like when you’re making dovetail drawers!).
You don’t have to spend a lot of money on a jig, you can get a nice jig from Porter Cable here, or if you really want the best you can get virtually anything from Leigh.
And for a router, I would suggest at least a 1.25″ horsepower router. You can get a decent one from Dewalt for not a lot of money here.
Just make sure that whatever router you get, that you make sure it has both a 1/2″ and a 1/4″ collet included and if it doesn’t – make sure you buy some.
Cutting Dovetail Joints
 Once you have the sizes needed for your drawers (again based off of the measurements for your drawer slides) you can start cutting your joints.
Using the jig, you just clamp one of the drawer sides at a time into the template (the little jig with metal fingers) and then use a dovetail router bit to cut out the pattern for the tail board. The tail board is the section with the largest box shaped joints showing – for me I always have the sides of the drawers set up to be the tail board.
After you’ve done that you attach the boards that form the front and back of the drawer – and these are called the pin boards. You use the straight router bit for these to cut out the pins. The pins are the visible sections of joint that stick through the tail boards on the drawer sides.
It’s best to cut a few samples to make sure you’ve got everything dialed in before you go to work on your actual drawer material.
Once you’ve got the drawers cut and you’ve test fitted them and are happy, you can rip a 1/4″ groove (using either a dado blade on your table saw, or a rabbit bit on a router table) about 1″ up from the bottom of each drawer piece (consult your drawer slides for the recommended drawer base) to receive the drawer bottom.
Then cut a piece of 1/4″ plywood for the drawer base and you can then glue and assemble your drawer bases.
Now all you need to do is sand any excess glue and you can move on to installing your soft-close slides in your cabinet base!
Leave a Reply