DIY Storage Cabinet – A Simple Cupboard Design
Whenever you’re doing a renovation or an update to your house, there always seems to be the need for some sort of custom cupboards or cabinets.
There always seems to be a space where the measurements and sizes required are just off enough that you can’t really get away with using some pre-fab off the shelf stuff.
And besides, that kind of stuff is either crazy expensive or the workmanship is exceptionally poor.
Or both.
And besides – it’s not that difficult to do on your own.
Page Content Navigation
Building a DIY Storage Cabinet
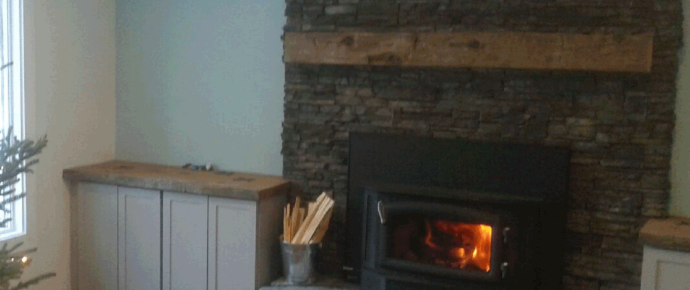
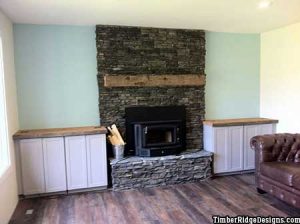
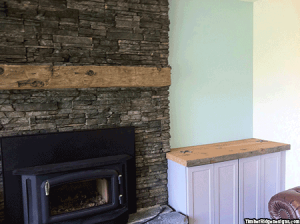
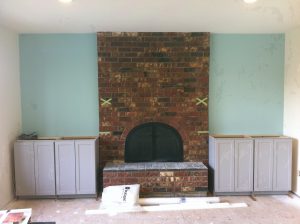 For this particular project, I was renovating our house and we wanted to put in a couple built in cupboards on either side of the fireplace for some added storage and a nice updated look.
The project didn’t need to be too complicated and as we were painting the majority of the cabinet it requires a little less perfection than if you were to be staining the wood.
The thought behind this is that the stain will show everything, whereas if you’re painting the cabinets you can use some wood filler and paint over it.
It all depends on what you’re trying to achieve with your project.
For me, having the ability to put in a couple shelves was good enough – we didn’t need drawers or anything like that as this will be holding most of our media stuff.
The Simple Cupboard Design – What You’ll Need
As with any project, there are a few things that you’ll need to get started.
You will need:
- A Table Saw
- A Circular Saw
- A Mitre Saw (not absolutely required – but will make your life much easier)
- A carpenter’s square
- Bar Clamps
- A Pocket Hole Jig
- Face clamp
- Screws for the pocket holes
- A Cordless Drill
- Sawhorses
- Measuring Tape
- Hinge Drill Jig
- Shelf Pin Drilling Jig
Some of the materials you will need are:
- Wood Glue
- 3/4″ or 1/2″ Plywood
- 1/4″ Plywood
- Wood Filler
- Paint
- Stain/Clear Coat
- Soft close hinges
Now, soft close aren’t a requirement but for me I thought I would spend the extra money and get them because they’re pretty sweet. I figured I was saving a lot of money on the project doing it myself so I felt I could afford to splurge a bit.
I built my cabinets out of 3/4″ sanded one face fir and they turned out great. You can use any material you want but I liked using the sanded 1 face plywood as there was less work needed to clean the wood up before I painted it.
3/4″ is really overkill for these sort of cabinets – you could get away with 1/2″ for sure. If you do go with 1/2″ just make sure you adjust for any changes in the dimensions needed if you’re following this guide exactly.
The Best Wood to Build Cabinets
Is there a really a “best wood to build cabinets?” I think it really comes down to what you’re trying to achieve and how you’re wanting to build them.
Some cabinet builders just use MDF. You know – that particle board with the smooth white melamine coating on either side.
It is dimensionally stable, is straight and doesn’t want to warp or twist.
But if it ever gets wet, it tends to soak up moisture pretty good and then it begins to fall apart.
And for that reason, I personally wouldn’t use MDF in any sort of environment with water (IE bathrooms, kitchens).
MDF aside, you’re left with various forms and grades of plywood.
Some cabinets use cheaper plywood for the main parts of the cabinets and then wrap all visible areas in either a really nice wood veneer or fairly thin (1/4″ or less) plywood like oak or some other nice wood.
Others even go all the way and make their cabinets using full hardwood plywood. But this is incredibly expensive.
For me, I used sanded one face plywood as it has a nice clean finish to it and takes less work to clean up before paint.
Keep in mind that if you go this route and end up using a softwood you will have to be a little more careful when cutting and handling your parts to make sure you don’t dent them or scratch them.
Softwood is much easier to cut and install and is less expensive, but is softer and will dent and scratch easier.
Now, if you’re using a softwood like I did you will need to use coarse screws to assemble it.
If you are using a hardwood then you will need to use fine screws.
Let’s Get Building!
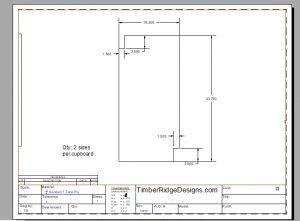
I’ve given some pictures of how I made my built in cabinets and the dimensions I used so you may need to change or adjust them based on the space you’re trying to fill.
In constructing these, I used the sanded face of the plywood facing inside the cabinets (so that when you look inside you see the nice sanded face).
For the face frame section, I used 1″x4″ pine boards ripped to size because then I wouldn’t have to hide the edges.
To hide the end grain of the plywood, I used wood filler to cover the ends and then sanded it all smooth once it was dry.
You could also use thin strips of veneer or cut strips of pine to cap the ends as well. If you do this, you will just have to account for the extra material and cut down your parts to allow for the extra width of the veneer or pine boards.
I didn’t go the veneer route as I found it to be very brittle and difficult to deal with. And as I was going to paint the cabinets anyways using wood filler worked just fine.
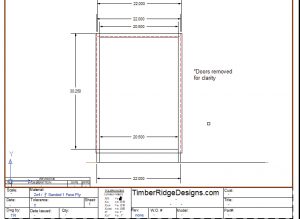
If you follow my design exactly, you’ll see that I built a bit of a hybrid system where I combined features of both faceframe and frameless cabinets.
I built a faceframe that extended out past the face of the cabinet carcasses as this will give you some adjustability when you go to install your cabinets.
But I kept the inside edge of the faceframe flush with the inside edge of the plywood. Typical faceframe cabinets have a lip that goes all around the inside of the cabinet that reduces the size of the items you can fit inside the cabinet.
I wanted to have all usable space inside the cabinets.
I’ve included the sizes and cut lists below for the cabinets so you can see exactly how I built them.
I didn’t use any fancy dados or anything like that – just regular pocket holes and screws. For me, I love the Milescraft pocket hole jig as I’ve found the little magnet they put on it to be like an extra set of hands when you are using a clamp to hold the jig on the plywood. Much better than the Kreg Jig.
BUT the driver bit and screws that come with the Milescraft are no good. The driver bit is a special shape (IE not a standard bit side) and after making a couple sets of cabinets, I stripped the bit to where it wouldn’t work any more. The little edges of the bit are too fine and not hardened enough to stand up to repeated use.
The solution – buy Kreg pocket hole screws. They use standard drill bit sizes and will still work if you use the Milescraft jig.
To sum up – I would recommend getting the Milescraft pocket hole jig and face clamp but use Kreg pocket screws.
Another little thing to keep in mind – when you’re drilling for the screw holes you want to ensure they are to be drilled on the side opposite the nice side of the plywood.
When you’re screwing the parts together, I found it worked well to clamp the wood together and then put the screws in. This way if the plywood has any sort of bow or warp in it, the clamps will hold it in place and then the screw will fasten it together – rather than the screw having to both pull the parts tight and fasten it as well.
I went about it in the following order:
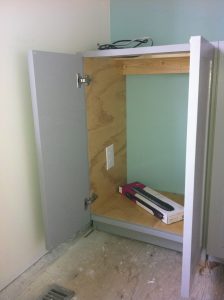
1) Cut the cabinet sides to size & cut out reliefs on top and bottom for the toe kick relief and for the board across the top at the back for mounting it to the wall. Remember, you have to keep in mind that you will want the nice face of the plywood on the inside of the cabinets – so the orientation and where you cut your top and bottom relief will matter. Once this was done, I drilled the holes for the shelf pins on the nice side of the plywood to hold shelving on the inside of the cupboards and then pre-drilled all the pocket holes on the OUTSIDE non-sanded face of the plywood at the different places where I would be attaching the face frame, back mounting board, cabinet base shelf.
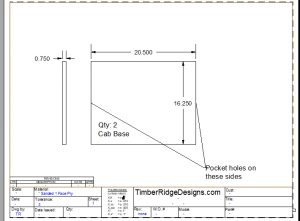
2) Cut the cabinet base to size & drill pocket holes on the outside edges on the non-sanded face of the plywood to attach the faceframe and to attach it to the cabinet sides.
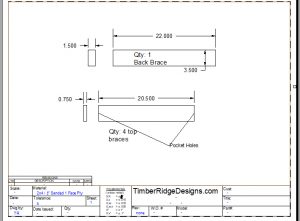
3) Cut the back mounting board to size & the upper mounting boards to size & drill pocket holes on both ends of the upper mounting boards.
4) Screw the cabinet base to both of the cabinet sides and then install the upper mounting boards & back mounting boards to the cabinet sides. Make sure that the cabinet is square as you do this by using a square and measuring tape.
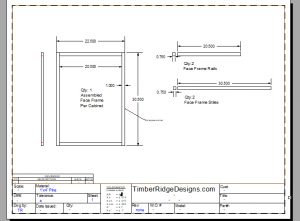
5) Rip 1″x4″ pine boards down to size to build the face frame and cut them to size. Then install the face frame around the outside edge of the cabinet base. Remember to keep the inside edge of the faceframe flush with the inside edge of the interior plywood of the cabinet.

6) Fill any any joints as required with wood filler – or you could just leave them if you wanted to. Sand and paint/stain as required.
7) Then I started working on making the plywood cupboard doors.
Plywood Cupboard Doors – A Simple, Quick Solution
When building the plywood cupboard doors I wanted to make them as quickly and easily as possible.
Most of the door designs out there involve using special router bits to create rail and stile parts that click together.
But as I just wanted a basic shaker style cabinet, I figured that I could simplify the process by making the doors out of one piece of plywood and then gluing strips of 1/4″ plywood onto the sanded face in order to give the shaker detail.
By doing having the doors as one solid piece, the doors won’t pull apart at the joints if the wood expands and contracts – which would cause the paint to pull away from the joint over time and you would have to touch it up every once in a while.
So I figured it was a win-win.
Doors won’t expand and contract wrecking the paint, and it was faster to make them.
All I did was cut pieces of 3/4″ plywood to the finished size of the door and then ripped strips of 1/4″ plywood for the detail and glued it all together. This gave the doors a 1″ thick finished thickness when all was said and done.
Then I used wood filler to hide the edges of the plywood all the way around and sanded it smooth once it was dry.
To hide the inside edge of the 1/4″ plywood on the shaker detail, I used a caulking gun with some paintable DAP to both hide the edges and give a little radius to the inside corner of the shaker detail.
I would highly recommend using masking tape to tape off both the top edge and inside edge of the doors before applying the DAP. Leave 1/8″-1/4″ of space offset on the inside of the shaker detail when laying out your tape.
Then apply the DAP and using your finger run it along the inside edge of the plywood in order to clean off the excess and leave a slight radius. By DAP, I’m just meaning some paintable caulking.
Once you’ve done this and are happy with how smooth it is, start carefully peeling off the tape to leave a nice clean edge.
When this is finished, you’re ready for paint.
Once painted you can install your hinges and mount them onto the cabinet carcasses.
The Kreg hinge jig couldn’t have worked better – I just set the location of the jig to the hinge manufacturer’s recommended setting and drilled the hole to the proper depth using the jig and everything worked out perfectly.
After that, you just need to screw the hinges onto the doors and cabinets and you’re ready to install the finished cabinets!
Then all you need to do is build a surface and if you want to go the concrete route, you can check our post on GFRC Countertops – The DIY Solution
OR you could make some amazing diy epoxy epoxy countertops by following our tutorial here.
Leave a Reply